Click on the magnifyer icon in lower
right corner of picture to see details.
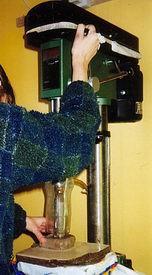
On the photo to the right you see me drilling a hole into a big stone that will become a tea light holder. I am using a core drill also tipped with small particles of diamond.
In the Workshop - "How do You Do that?"
I have been asked that question very often, I'll try to give you an idea how I turn a rough beach pebble into a shiny colorful gem. A word to the gem cutter (lapidary) who normally cut precious stones and might just read this page: cutting rock is something entirely different to cutting precious or semi-precious stones. Therefore you may find that I do things different to your ways of cutting. Natural rocks are unpredictable, stubborn and unco-operative subjects which do not want to be polished and often refuse for a long time to show any gloss. Mostly I win... .
There are several ways to get pieces of rock polished. Here we are looking at two methods. The stone can be shaped, ground, and polished on wheels, or, a load of stones can be polished in rotating barrels. With the first method the lapidary creates exactly the size and shape he had in mind. The second method produces shiny stones that have retained their original shape, just somewhat rounder and slightly smaller. Those are called tumble-polished stones. Both methods can be done in the lapidary's workshop, or, in a factory where the daily output is huge and accordingly the prices of he pieces are much lower.
This is a tumble-polisher (right photo). A little motor turns two rods continuously which in turn keep two rubber barrels rotating. At the beginning a load of stones goes into the barrel with water and a coarse grinding grit. Now let it tumble for a week. Then wash the stones thoroughly and put them back in with a finer grit. Repeat that 3 or 4 times with ever finer grinding grits until after the finest polishing powder they are the most beautiful heap of pebbles ever seen.
The whole process takes 4 to 5 weeks.
Tumble-polishing is an easy and affordable way of polishing the pebbles collected in your last family holiday - if the kids have the patience to wait four or five weeks until they can see the results! I use tumble-polished stones for small gifts and as pendants for some necklaces.
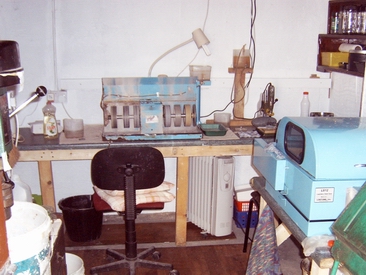
Welcome to my Workshop!
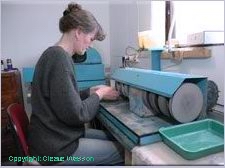
On the workbench (photo below) at the back wall you see the grinding-, sanding-, and polishing wheels and a small drill to make those tiny holes in pendants. All wheels are coated with diamond particles of decreasing grit size. The blue thing at the right wall is a slab saw.
Making a Pendant
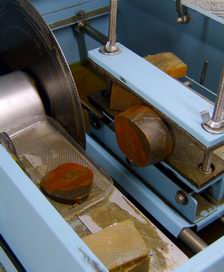
There is much more work to the shaped stones to be mounted into Sterling Silver pendants or bracelets. They are cut from slabs of the stone about 4-7mm thick. Slabs are made with the slab saw (photo right), the blade of which is again tipped with diamond particles. So, actually, the stone is not sawn but ground through. I draw the outline of my piece on the back of a slab and break off the surplus stone around it with a pair of nippers (see pictures a bit higher up on the left - stage 0). ~
Now I can sit down and start grinding the shape of my piece with the coarse grinding wheel (stage 1). If the stone is very hard like flint or other quartzes, this can be quite a demanding task. All cracks, holes and other blemishes of the stone need to be removed and for mounting it must be the exact size of the pendant or bracelet setting. ~ This done, I use the finer grinding wheel to smooth down the scratches of the coarse work . ~ The next two wheels are for sanding, i.e. further smoothing my shape by going all over it again and again whith each ever finer grit-sized wheel.(3,4) ~ (Does that sound boring? Well, so it is!) ~ Two more stages on the polishing wheels and I can see the hoped for shine appearing on my stone (5,6). ~ In most cases I need another go with the extremely fine polishing disc (50 000 mesh) on the side of the machine.
This is where you need the patience: some rocks just don't want to shine! So I go over and over them again and again and only stop when they look like glass. That can take hours! People say to me: You are really doing a labour of love!(I guess what they think is: That woman must be crazy!)
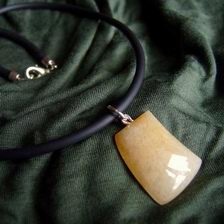
All the boring time is forgotten and I am delighted with the beautiful gem (7) I have produced!!! Now I go and set my piece in a nice Sterling Silver setting, add a chain and - here you are! (pict. Voila!)
Anybody looked at their watch when I began? Well, I did, it was 4 hours and 45 minutes ago.
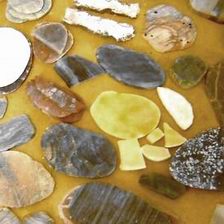
Stage 0 Outline drawn on a 7mm thick slab. Surplus stone around it broken off.
Stage 1 Halfway through shaping the perfectly roundet dome. Then stage 2, smoothing.
Stages 3,4 Working on the sanding wheels. It is now 6mm high and 50mm in diameter.
Stages 5,6 On the polishing wheels. One could nearly be happy with it now, but I know I can do better.
Stage 7 The last rubover has been done on the 50,000 mesh disk - finished!
Voila! Now, compare this to any old boring colorless diamond - which is more beautiful???
(Sorry, it's sold now - but here
are more here)
mouseover!
The seven stages of Toil and Trouble